
Introduction Link to heading
So, you fancy your own website or a blog space like this one??
Such an endeavour can be a daunting task, especially if you’re not a web developer or understand how to host you own site and infrastructure to support it. What about security? What do I even call this thing?! So many complicated pieces argh..
Sounds like this post is for you! ;)
In this post, I’ll show you how to deploy and host a static site using AWS s3 and CloudFront.
This is a cost-effective way to host your web presence that doesn’t require a server to run it! It also means you can take advantage of AWS’s global infrastructure to deliver your site to users around the world. Gain lower latency and higher performance by caching your site closer to your users via AWS’s Content Delivery Network. Protected from dynamic attacks CloudFronts got your back!
I guess the question now is, what does it cost?
Your domain name will likely be the most expensive part of this exercise, but even then, it is only a few dollars a year depending on the type of domain you choose. (Please note: You will need to purchase a domain name via Route53 and have Route53 manage your DNS records for this Terraform to work correctly)
Keeping an eye on your AWS bill is very important, should you receive a spike in traffic, costs can start to climb, especially if your serving media such as video or sound. Checkout https://aws.amazon.com/pricing/ for more information on AWS Pricing.
A note on AWS Free Tier, you can take advantage of the AWS Free Tier for new accounts, which gives you a year of free usage of many AWS services, including s3 and CloudFront. This is a great way to get started with hosting your own site on AWS without incurring any costs.
Quick Note on AWS Costs Link to heading
Before we get started, it is important to understand the costs associated with hosting a static site on AWS s3 and CloudFront. Here are some screenshots from running InfraCost across the Terraform code in the aws_s3_static_site GitHub repository.
All prices are charged in $USD by AWS:
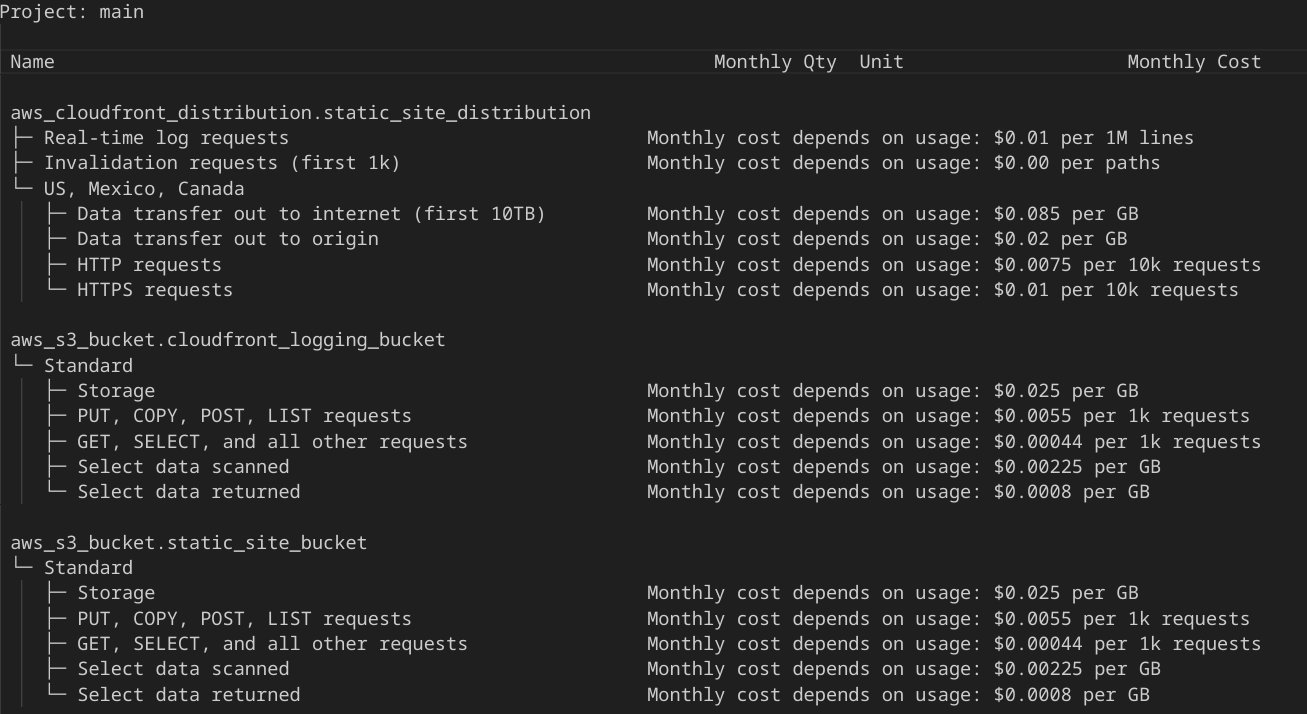
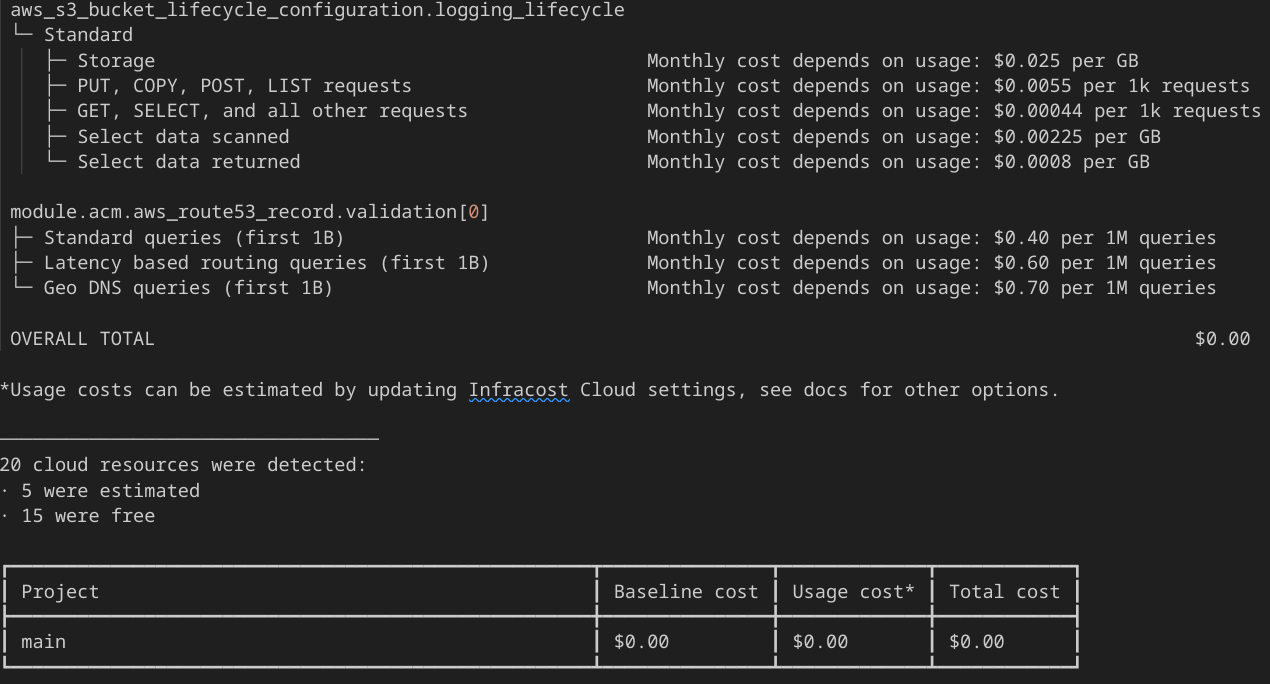
As you can see, it’s virtually free!
Please ensure you read up on CloudFront and s3 costs to avoid any AWS bill shock. Setting an AWS Budget is a good way to keep track of your costs and avoid any surprises. For example, setting a $50 threshold will email you if you reach that amount in a month allowing you to investigate your AWS account.
What is a Static Site? Link to heading
We need to start with the basics, what is a static site?
A static site is a website that is made up of HTML, CSS, and JavaScript files that are served to the user’s browser. These files are stored on a server and are delivered to the user’s browser when they visit the site.
So.. As you can see, you do not need to manage your own web server, its done for you :)
You can host a static site using AWS S3 combined with CloudFront. AWS s3 is an object storage service that allows you to store and retrieve files by placing them into a bucket which is accessible from your browser (or API call).
Static sites are great for blogs, portfolio, brochure style sites. These are fairly basic informative sites with minimal user action.
The differences between a Static Site and a Dynamic Site is that a static site is made up of HTML, CSS, and JavaScript files that are served to the user’s browser, whereas a dynamic site is made up of server-side code that generates the HTML, CSS, and JavaScript files that are served to the user’s browser depending on dynamic factors, such as personalisation etc.
The trade off is that dynamic sites are more complex to build and maintain, require a server to run, and are more expensive to host. Static sites are easier to build and maintain, don’t require a server to run, and are cheaper to host. w00t!
A great example of a static site is BeardBench, in fact, you will use the same code from my aws_s3_static_site https://github.com/kn0xyland/aws_s3_static_site GitHub repository to deploy your own site. A quick start to getting you on the road quickly.
Let’s get to it!
Deployment Instructions Link to heading
The following prerequisites are required before we start:
- An AWS account
- Terraform installed on your local machine
- AWS CLI Installed and Configured for your AWS Account
- Git installed on your local machine
- A text editor such as Visual Studio Code
- A GitHub account
- A domain name (Required! We will use AWS Route53 to create and host your domain name)
- An s3 bucket for your Terraform state!
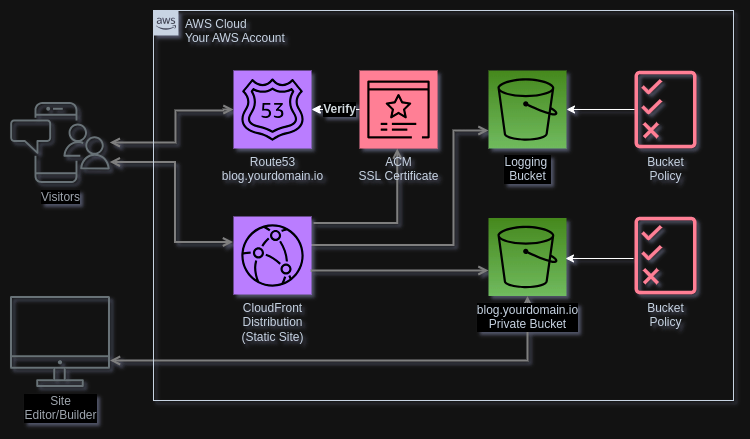
For this blog, we will simply deploy a very basic HTML page via CloudFront with a origin source of an s3 bucket. A private s3 bucket! Contrary to popular belief, you can host a static site in a private s3 bucket and still serve it via CloudFront without exposing your s3 bucket to the public internet. SSL backed by ACM, CloudFront will serve your site via HTTPS.
Building S3 and CloudFront Link to heading
Let’s get deploying!
First, you will need to clone my aws_s3_static_site https://github.com/kn0xyland/aws_s3_static_site GitHub repository to your local machine.
Once cloned, you will need to update the terraform.tfvars file with your own values. The terraform.tfvars file contains the following variables which I will briefly explain:
Terraform Variables Explained - Replace with your own values
| Variable Name | Value | Description |
|---|---|---|
| name_prefix | mytestsite | Short name of your site |
| awsregion | ap-southeast-2 | The AWS Region (Sydney is Default) |
| aws_account_id | 00000000000000000 | YOUR AWS Account ID |
| static_bucket_name | mytestsite.mysite.io | Website bucket name - Must be the DNS name of your site |
| logging_bucket_name | mytestsite-logging123 | Name of logging bucket |
| expire_days | 7 | Logs Lifecycle rule - Auto delete after 7 days is default |
| zoneid | XXXXXXXXXXXXXXXXXXXXX | The Route53 Zone ID for your domain |
| fqdn | mytestsite.mysite.io | The Full DNS name of your website |
Replace all the values you see here with your own, especially the name_prefix,aws_account_id, static_bucket_name, logging_bucket_name, zoneid, and fqdn values. These MUST match your own account details to work correctly. Please also ensure that your AWS CLI is configured for the destination account so that your Terraform can deploy the resources.
A note on Domain Names, this Terraform requires the use of Route53 and ACM to generate SSL certificates for your site, without Route53, ACM will fail. For the purpose of simplicity, this Terraform requires your domain to be set-up on AWS Route53 prior to running this Infrastructure code!!
Deployment Link to heading
- Remember to create your s3 bucket for your Terraform state, update
versions.tfwith your bucket name and region before executing these commands!
git clone https://github.com/kn0xyland/aws_s3_static_site.git
cd aws_s3_static_site
terraform init- Update the
terraform.tfvarsfile with your own values
Now plan and deploy your infrastructure!
WARNING! You are about too deploy infrastructure to AWS, please ensure you have the correct permissions and are deploying to the correct account. BeardBench takes no responsibility for any costs or damages incurred by deploying this code. Please ensure you understand the code and what it does before deploying it to your AWS account.
Recommend setting an AWS Budget under cost control, which can email you if a certain $ threshold is reached. This is a good way to keep track of your AWS costs and avoid any surprises!
terraform plan -var-file=terraform.tfvars
terraform apply -var-file=terraform.tfvars
All going well, you should now have a fully deployed infrastructure for your static site. You can now upload your HTML, CSS, and JavaScript files to your s3 bucket and access your site via your domain name.
Let’s have a look around, shall we?
Exploring the AWS Console Link to heading
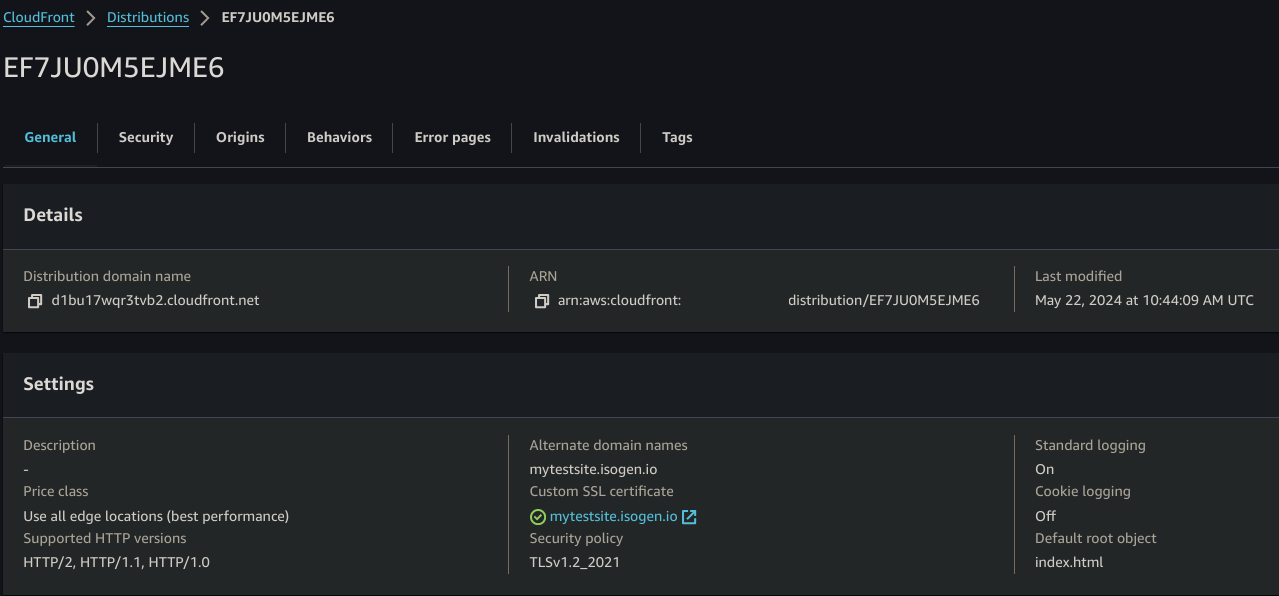
Let’s start with CloudFront, log into your AWS console and cruise over to CloudFront within the account you deployed too.
You should see something similar to the below screenshot, I used my own domain to demo the deployment, your domain should be present in your deployment. Navigate around your distributions tabs to understand the settings at play. The Terraform deployment has done the following things for you:
- Sets the SSL Certificate for your deployment - See ACM - This enables HTTPS
- Enables Standard Logging and feeds it to your s3 logging bucket (Default 7 day auto delete lifecycle rule is enabled to save cost on logs storage)
- Enforces TLSv1.2_2021 SSL/HTTPS
- Sets your private s3 static site bucket as the Origin of your site (This is where your website files are stored and served from)
- Redirect users from HTTP to HTTPS so your users are always using your secure site via SSL
- Sets up the OIC Origin Identity so CloudFront has permission to talk to your private s3 bucket. OAC supersedes OIC.. but for now this is ok
- Serve from all Edge Locations for maximum performance - You can reduce this setting to save on cost
That is pretty much it for CloudFront, there are many configuration options available for CloudFront, ensure you read up on these options to understand its full capability. Now, lets have a look at the s3 bucket to understand more about the storage that holds your website data.
s3 Simple Storage Service Link to heading
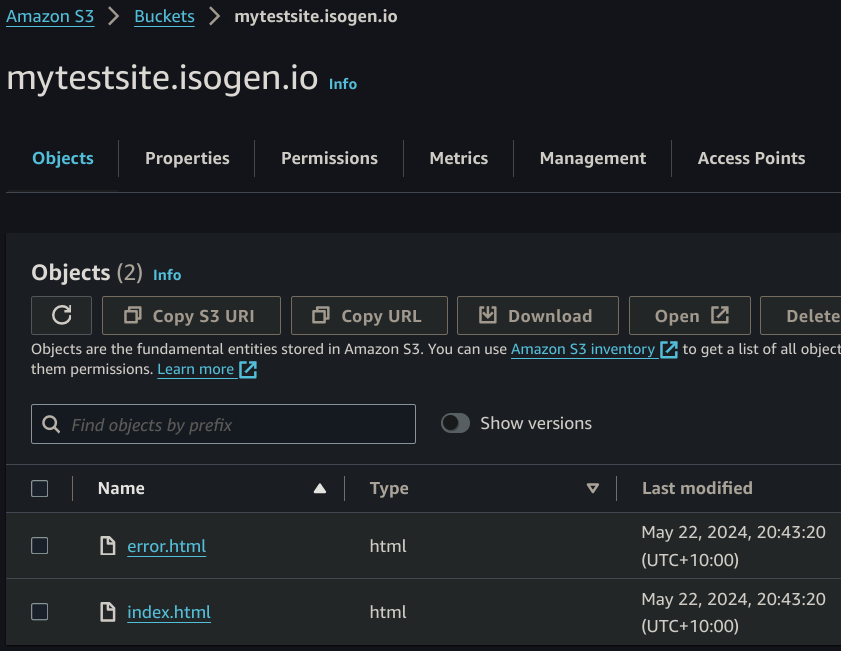
Head over to ‘s3’ in the AWS console, you may need to select the Sydney region ‘ap-southeast-2` (Region is set by the terraform.tfvars).
Once you locate your static site bucket, it will be the domain name you specified. In my example above, you will see mytestsite.isogen.io, head into the bucket and you see two simple files, index.html and errors.html (This is the beginning of your website). For now, this set-up is basic to get you up and running.
Head over to your browser and punch in your domain, you should see a simple page welcoming you to your new static site and that “Deployment Successful” greets you on your screen. If it has not and you have an error, something has gone wrong. Please check your Terraform deployment and ensure all settings are correct.
ACM - Amazon Certificate Manager Link to heading
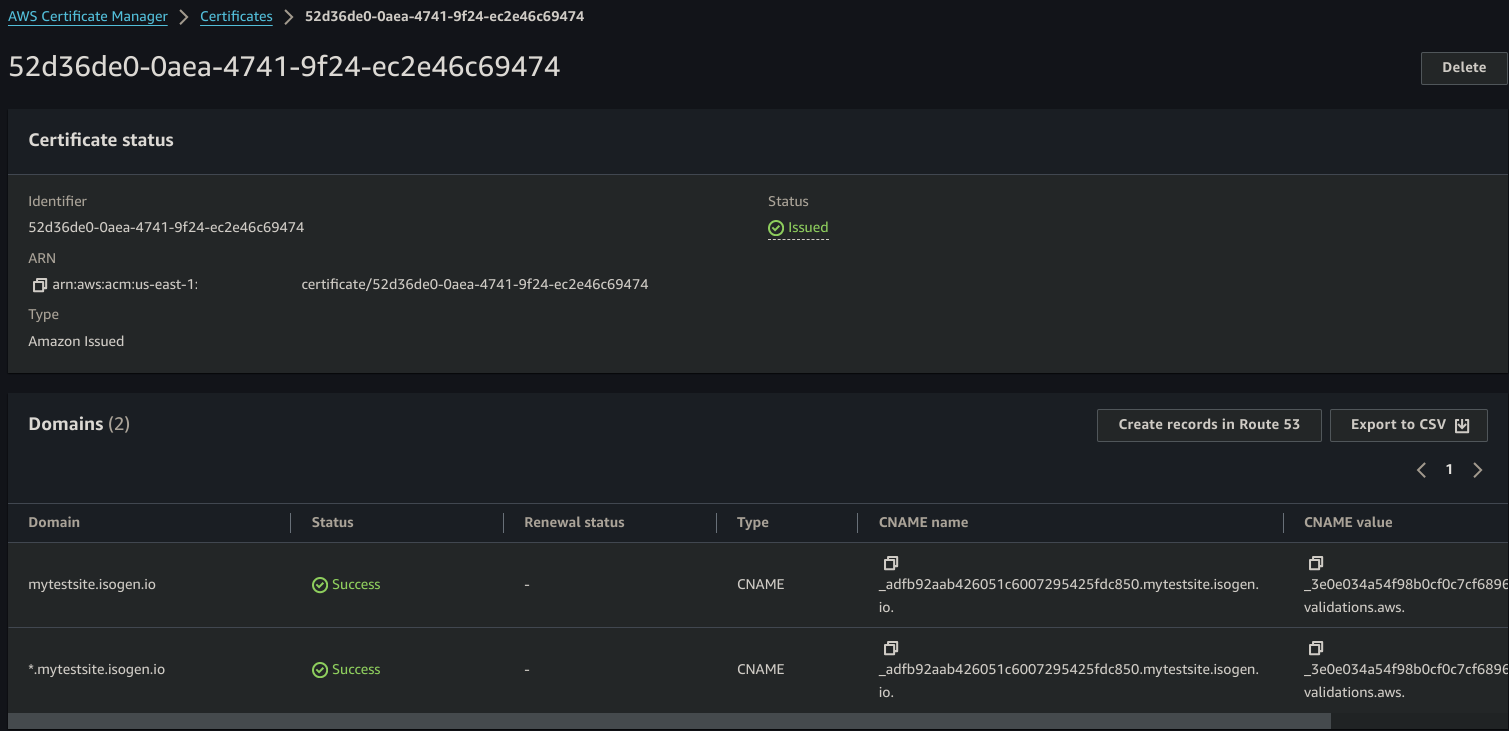
Your sites SSL certificate lives here, during the Terraform deployment, records were created in your Route53 to allow your SSL site certificate to generate itself, validate itself as being authoritative and then apply itself to your CloudFront distribution. This allows HTTPS connection via your sites security certificate.
Feel free to look around the ACM console to understand your SSL certificate.
Route53 Domain Name System (DNS) Link to heading
Now let’s jet over to Route53 where your sites DNS records are managed from.
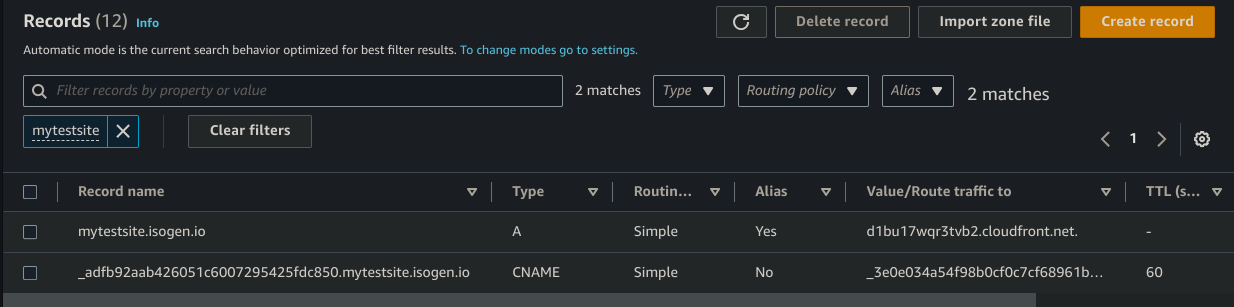
Here you will find your Public Hosted Zone where your domain name lives. Notice your site domain name is here, also take note of the other record present, this is for your SSL certificate validation (This is auto generated for you, do not remove)
You’ll also notice that your domain name points to the CNAME of your CloudFront distribution, now things are starting to make sense!
Head over to your website domain Link to heading
What do you see?
A simple page which welcomes you to your s3 static site with a “Deployment Complete” hopefully!
That’s it! Congratulations!!
You are now online, all your AWS infrastructure has been stitched together via Terraform and in sequence to support your static website hosting requirements. Now it is up to you what you design and deploy website wise!
- Consider creating a GitHub account if you do not already have one, create yourself a repository and start building your new static site. :)
BeardBench uses Hugo (which is outside the scope of this guide). Hugo is a rich static site generator which simplifies static site creation, it even has deployment commands so you can deploy to your s3 static website bucket, this automates the publishing aspect to your new static site.
Checkout https://gohugo.io/ for more information
Conclusion Link to heading
Let’s wrap this up, you have successfully deployed a static site on AWS s3 and CloudFront using Terraform. You have also explored the AWS console to understand the resources that were created during the deployment. You also understand there are many other options that can be configured for your static site, such as custom error pages, custom headers, and caching settings.
Definitely hit up the CloudFront documentation to understand the full capability of AWS CloudFront and set your own policies/Configurations, my Terraform code is a starting point for you to build upon.
Thanks for reading this guide, if you found it helpful, give us a shout out on BeardBench X (Twitter) account, each BeardBench post has an associated X (twitter) post for comments. One day I will get around to enabling a comments systems within Hugo, but for now, keeping things simple :)
Stay tuned for more guides on AWS and Terraform.
Until next time, happy coding! and remember to keep an eye on your AWS Bill!! (BeardBench will not be held responsible for any costs incurred by deploying this code)