Secure Private Cloud Network on AWS (Part One) Link to heading

Introduction Link to heading
Imagine this, you are planning on adventuring overseas and you need to ensure that your data is secure and private whilst you are away. You could use a VPN service.. but that would be boring.. you are a tech savvy individual so you decide to do it yourself. And why not! Why not run your own cloud network fully controlled by you!
Well.. you have come to the right place :o)
I have been running my own for nearly a year now and I have to say, it’s been a great experience. I have full control over my network, I can access my home network resources from anywhere in the world and I can also access my AWS VPC resources from the inside. I can stay logged onto my Meshtastic LoRa node mounted on my roof whilst I am away from home and still receive grid messages from the mesh network (and reply) g33ky!
The following blog is going to assist you in setting up your own private cloud network, I will provide you with the Terraform code required to deploy the solution from my Github repository and the instructions to get you up and running quickly.
You will need some knowledge of AWS, Terraform and WireGuard to get started, but for the most part I have created a bootstrap that will set-up everything up for you, so you simply have to log on :)
If you do not have an AWS account you will need to create one, this solution can run within the AWS Free Tier for a period of time, please read up on AWS Free Tier here to understand more.
Disclaimer: I will not be held responsible for any costs incurred by you deploying this Infrastructure code into your AWS accounts. Please remain mindful of the resources you are deploying and the costs associated with them whenever using a public cloud platform.
With that out of the way, let’s get started!
Design Overview Link to heading
To understand this better, let’s have something visual.. that’s hopefully not too abysmal ;)
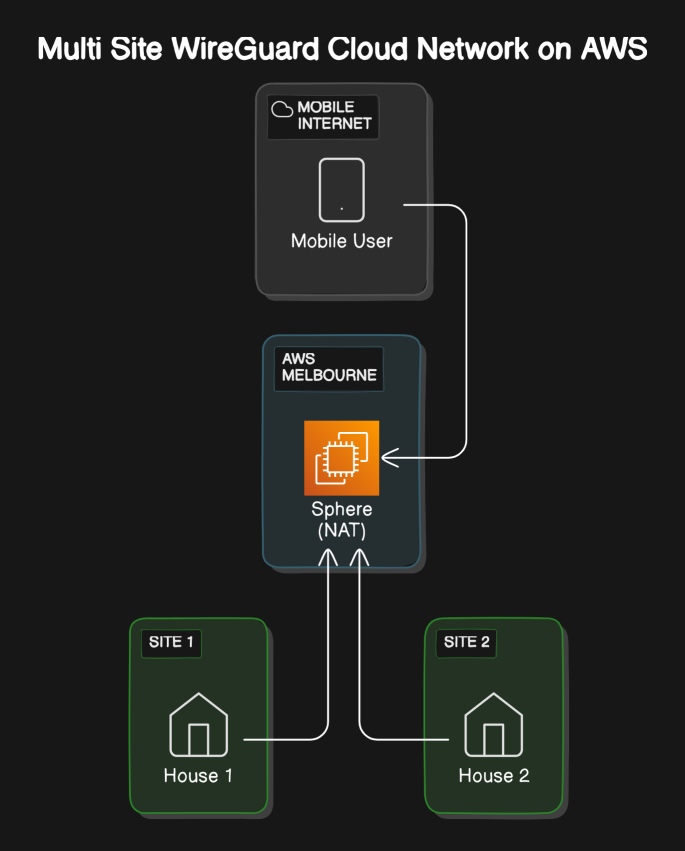
The purpose of this architecture is to ensure that you DO NOT need to open firewall ports on your end devices, this improves security by keeping your home firewalls (endpoints) closed to the Internet. Exposing your home network to the open Internet. Eww.. Why would you want to do that!
That is where Wireguard comes in, it is going to “dial out” to a Linux instance called Sphere (Or whatever you name it) hosted within your AWS VPC to establish the VPN connection. E.T phone home, pretty much..
Prerequisites Link to heading
To join in on this phun, you will need the following:
- An AWS Account
- The AWS CLI installed on your local machine
- Terraform installed on your local machine
- Git installed on your local machine
- AWS s3 Bucket (For Terraform State)
- Route53 Domain (Optional but recommended)
- Home Network
- Mobile Device
- WireGuard App on end points (iOS/Android/Linux/Router)
- A sense of adventure
Before getting into the design, we need to take a step back and ask why and rightly so! Why would you want to create a private cloud network in the first place?
The answer is simple, security and privacy.
I can’t recall the amount of times I’ve been weary of “free WiFi” when on the road with either my laptop or phone. Whether it be at the airport or on the resort WiFi whilst on holiday.
The thought of my data being intercepted and compromised is a scary thought, so I decided to create my own private cloud network to ensure that my data is secure and private whilst I am on the road.
Use Cases Link to heading
Some use cases for a self managed private cloud network could be:
- Connecting two or more properties over the InterTr0nz (Internet) privately
- Roaming Users VPN (Mobile Devices)
- Remote IT Support for family members
- Accessing your files and resources from anywhere in the world
As you can see, the use cases are many.
My Use Case Link to heading
Have some fun with it! But also,
- Connect my home LAN/Lab to my AWS VPC in the Melbourne region (ap-southeast-4)
- Provide a secure connection to my mobile devices whilst on the road
- Provide the ability to access our Meshtastic LoRa node mounted on our roof at home (More about Meshtastic in a future blog post)
- I DO NOT want to open incoming ports on ANY of the home networks/endpoints
A note for CGNAT users, if you can’t open ports to the Internet due to your Internet provider using CGNAT.. then this solution will work for you well! Endpoints are going to phone home (AWS)
Things should also be as transparent as possible of course to ensure ease of use at any location without having to fiddle with settings every time you move around. How nice would that be!
Design High Level Link to heading
The design is simple, we will create a WireGuard VPN server in our AWS VPC and connect our home network to it. We will then connect our mobile device to the WireGuard VPN server to access our home network resources as well as any AWS VPC resources. Nice right!!
As an edge case, I want to connect a family member’s LAN to the solution to assist with any remote IT support they might need. Now things are starting to get geeky <3
Let’s get started!
Deploy NAT Sphere Link to heading
To get us up and running quickly, I have put together a Github repository with all the Terraform code required to deploy the solution.
At a high level, aws_nat_sphere deploys:
A Terraform AWS VPC Module with the following resources:
- AWS VPC (in the AWS region of your choice) with;
- 3x Availability Zones
- 3x AWS Internet Gateway (IGW)
- 3x Public Subnets
- 3x Private Subnets
- Custom naming and tags for resources (Used by EC2 bootstrap)
A Terraform AWS EC2 Instance with the following resources:
- EC2 t4g.small (Graviton Processor) running Debian Linux into Availability Zone A
- IAM Instance Profile Role with Policy
- A Security Group with rules to allow SSH and WireGuard traffic from your home network’s public IP address
- A Route53 A Record to update the public IP of the EC2 instance
- An Auto-scaling group with a minimum of 1 instance and a maximum of 1 instance
Let’s take a look at the terraform.tfvars file in the repository to see what we need to configure before we deploy!
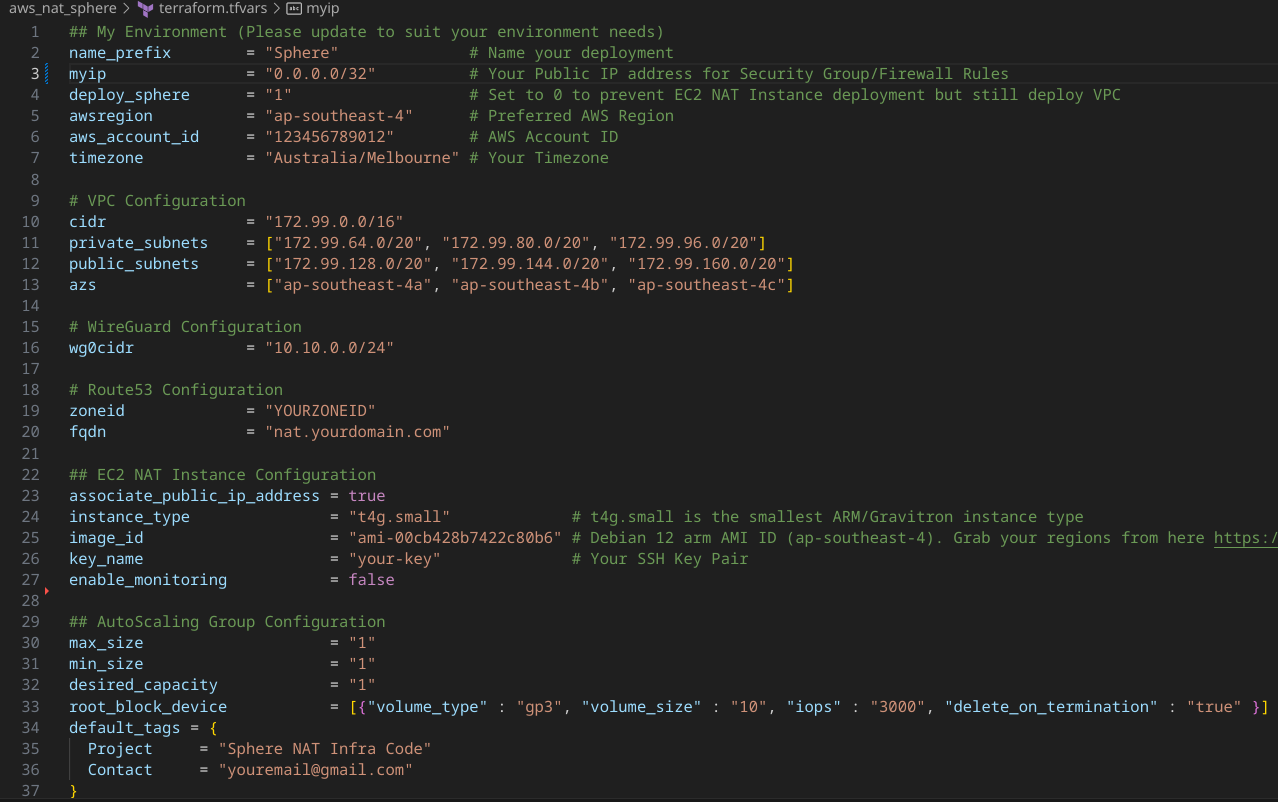
The following parameters should be updated to reflect your needs, the remainder can be left as default for this deployment:
- name_prefix
- aws_account_id
- myip
- awsregion
- timezone
- zoneid
- fqdn
- image_id
- instance_type
- key_name
You can use any instance type that supports either x64 or ARM. You could, for example.. run this within the AWS Free Tier for a period of time ;)
Once the EC2 has launched, a bootstrap is executed via CloudINIT through a script called scripts/user_data.sh which prepares the instance. Several things happen when this script executes
The Bootstrap does the following things on boot:
- Install packages from Apt and the AWS CLi
- Configures Linux to enable IP Forwarding
- Disables EC2 ‘Source Destination Check’
- Updates the VPC’s private route tables and sets default routes to the NAT Instance ‘Sphere’
- Generate Wireguard configuration (Server and Client Configurations)
- Sets the Hostname and Route53 A Record to the public IP of the EC2 Instance
- Raises shields and applies an IPTables Firewall ruleset in addition to the EC2’s Security Group
The bootstrap included in the aws_nat_sphere repository was intended to create a basic configuration for a single wireguard client. We will need to modify the configuration to suit our needs.
To achieve the solution design, we will create 3x WireGuard interfaces:
- wg0.conf - For Mobile Users Configuration
- wg1.conf - For Site 1 Configuration
- wg2.conf - For Site 2 Configuration
Included in the aws_nat_sphere is a script which will generate the 3x wireguard configurations and their client configurations. Access this script from the 3_Please Script
Why 3 configurations?
Well.. I like to keep things separate and clean, it also allows for easier troubleshooting and management of the network. Sphere’s routing tables (when we are done with them) will be kind of complex, so it’s best to keep things simple and clean.
Before we can do that, we need to deploy Sphere!!
Go ahead and git clone the aws_nat_sphere repository
Ensure you have configured your awscli and terraform before running. You will also need an s3 bucket to store the terraform state file. Once you have created your s3 bucket please update the versions.tf file with your bucket name and region before running terraform apply!
Unhash the end of the versions.tf file to enable the s3 backend for Terraform, update to use your bucket name and region!
- backend “s3” {
- bucket = “YOUR-TERRAFORM-BUCKET-NAME-HERE”
- region = “ap-southeast-4”
- key = “terraform.tfstate”
Run the following commands when ready to deploy
git clone https://github.com/kn0xyland/aws_nat_sphere.git
cd aws_nat_sphere
terraform init
Once Terraform has finished its INIT phase, you can now “plan” then “apply” the aws_nat_sphere Terraform code. But before you do, ensure you have modified the terraform.tfvars file with your desired configuration.
You will need to define a DNS domain name managed by Route53 in the terraform.tfvars file, this is used to update the Route53 A Record with the public IP of the EC2 instance.
You can leave the VPC CIDR and Subnets CIDRs as is for this deployment, it is super important to ensure that we do not experience any CIDR overlaps at any point within the network we are creating. (Or there will be trouble!)
If the defaults in this file cause a conflict please update accordingly.
To execute, run the following commands (Try running the plan command sequence first, this will show you what Terraform is going to create and where! useful to see where things are going to live before you apply)
terraform plan -var-file=terraform.tfvars
terraform apply -var-file=terraform.tfvars
After the pretty display of text flies across your console, you should have successfully deployed aws_nat_sphere.
If you have a Route53 domain, you can now access the EC2 instance via the domain name that you configured. If you have decided to use another DNS provider you will need to grab the public IP from the console or awscli and update your DNS provider manually.
It is recommended to use Route53 with aws_nat_sphere as there is logic within the bootstrap that handles updating Route53 automatically. If an auto-scale event occurs during the life cycle of Sphere, the Route53 record will be updated to the new public IP of the instance automatically via the bootstrap.
WireGuard Configuration Link to heading

Sphere’s bootstrap will generate the first WireGuard interface wg0 on start. The wireguard encryption keys for both the client and the server have been built under /etc/wireguard/wg0.conf and activated on boot.
The client end config is built and stored under /home/admin/wg0-client.conf
That would be fine if we only wanted one WireGuard interface, but we want three!
So we will nuke the existing WireGuard configuration by running the 3_please.sh script located under scripts/3_please.sh to generate the other WireGuard interfaces. Simply copy this file to /etc/wireguard on the Sphere instance and run it.
It is important to note that each interface will have its own set of keys and configuration files. It will also define each WireGuard interface on a separate port to avoid any conflicts.
- wg0 on UDP/51820
- wg1 on UDP/51821
- wg2 on UPD/51822
Let’s generate the other WireGuard interfaces!
## WireGuard Setup and Config
cd /etc/wireguard
umask 077
# Run script to generate 3x wireguard interfaces
chmod +x 3_please.sh
./3_please.sh
That was easy! We now have 3x WireGuard interfaces, each with their own set of keys and configuration files. The 3_please.sh scripts activated the wireguard server end interfaces for you. Check it out by running the following command:
sudo wg showPlease also note that the security group rules are configured to use your home router’s public IPv4 WAN address which you defined inside the terraform.tfvars file under parameter MYIP. This locks down ingress to SSH and Wireguard from your home IP rather than the entire planet :) you’re welcome
-
The use of autoscaling, I decided to opt for an auto-scale group for this solution to take advantage of its ability to self recover in the event of an AZ failure, or if the node stops responding, AWS will deploy a new instance and the bootstrap will self heal itself back into existence.
-
WireGuard configuration will be stored in /Sphere/wg0 using SSM Parameter Store
-
Sphere (Or whatever you name it..) should be considered “Ephemeral” infrastructure. Make changes through code, not directly on the instance ;)
With Sphere (or whatever you named it to) and WireGuard configured, we can now move onto configuring our end devices to connect to the VPN.
WireGuard Client Configuration Link to heading

Depending on how you intend to use the client configuration files, you may need to modify them to suit your needs.
- Copy
/home/admin/wg0-client.confto your mobile device and import it into the WireGuard app. - Copy
/etc/wireguard/wg1-client.confto your home network and import it into either the WireGuard service on your Home Router or your Linux machine. - Copy
/etc/wireguard/wg2-client.confto your family members’ network and import it into the WireGuard service on your Home Router or your Linux machine.
Android Users: The wg0-client.conf file under /home/admin will need the POSTUP, POSTDOWN and TABLE lines removed from the configuration file if you wish to use the configuration file to setup your Android/iOS WireGuard app
It is also a good idea to rename the client configuration files to their interface name, for example:
/home/admin/wg0-client.conf should be renamed to wg0.conf, the same goes for wg1 and wg2 client configs
For Linux systems, you can up and down the WireGuard Interface as follows (Assumes you have WireGuard installed and have copied the client configuration from Sphere /home/admin/wg0-client.conf to /etc/wireguard on the client end device before running these commands:
# This is done on the client/home network end, not Sphere.
# Assuming this is Site 1, wg1-client.conf would be used
# Use wg2-client.conf for Site 2

sudo wg-quick up wg1
sudo wg-quick down wg1
My firewall has the ability to run WireGuard, so I have configured it to connect to Sphere. This allows all devices on my home network to connect to Sphere without having to configure each device individually. It also enables me to share network resources like my Meshtastic LoRa node with my mobile device whilst I am away from the house. Neat!
If your home router does not support WireGuard, that is OK! You can run this on a Raspberry Pi or any Linux system with IP Forwarding enabled.
You can then for example create a static route that tells your home router to forward traffic to the your local Linux instance running WireGuard.
With everything set-up, Sphere and WireGuard with the client configurations in place at their destinations, you should now be able to connect from your home network to Sphere, and from “Site 2” to Sphere. Ping each side to confirm everything is working as expected.
If you have any issues, please check the following:
- Ensure that the WireGuard service is running on Sphere
- Ensure that the WireGuard service is running on the client
- Ensure Sphere’s Security Group rules allows the WireGuard ports (UDP: 51820, 51821 & 51822) from your IPv4 addresses of your endpoints
- Ensure that the WireGuard configuration files are correct and have the correct keys
Let’s check out what Sphere looks like now, run the following command:
sudo wg showWhat you should see is all three WireGuard interfaces up and running on the Sphere instance, here is a screenshot of what it should look like having all three interfaces up and running with devices connected
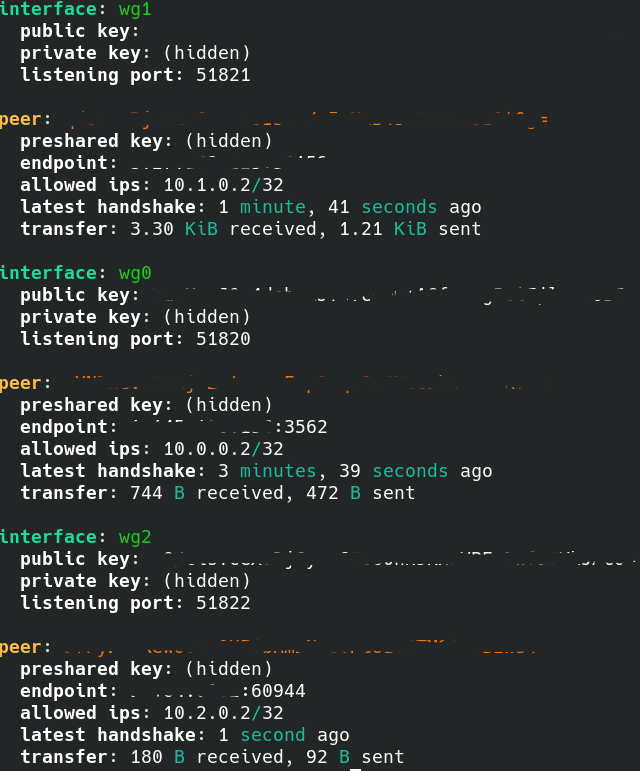
CONGRATULATIONS! You have successfully deployed Sphere along with a complex WireGuard VPN network of 2 sites and dedicated interface for mobile users :) You should be able to ping each side of the tunnel from Sphere and from any of the three end points.
There is still more work to be done to get routing set-up correctly!
To be able to transparently route traffic between site 1 and site 2 additional configurations are required. For now, each end is now connected to Sphere and can communicate with each other across the overlay network (WireGuard Network)
Check out Part Two of this series where we will configure routing, update the WireGuard configurations with the destination LAN CIDRs through the allows_ips and how to modify the POSTUP and POSTDOWN options so that routes can be added and removed dynamically when the Interfaces are brought up and down.
Thank you for reading this far and I hope you found this helpful!