
#!$#^@! - Yep.. We have all been there..
You are simply trying to get something done that requires a stable connection to your WiFi, and it’s just not happening. A whiff of one bar and a terribly weak/slow connection..
So.. of course, you start moving around your house or apartment trying to find a better spot, and after a barge of creative expletives and a jumpy zoom call, you find a spot that works.. Fortunately, your connection was dropping out whilst you were being most articulate so no one actually heard you :/
Chatting with my neighbour recently, he mentioned he was having issues with this WiFi connection dropping out and being slow in parts of his town house. The theme of our conversation is explored in this blog post, and I hope it helps you too!
So let’s explore a few of these tricks you can use to improve your WiFi.. before the router goes flying out the window? ^_^
Cheap WiFi Routers (The crappy ones your Internet provider generally gives you) Link to heading
Before we crack into it, the first thing to consider is the quality of the router you have been given by your ISP. Generally, these are the cheapest routers available, and they are not the best performance wise. Before running out and buying a new router though, try these suggestions and see if it improves things.
The obvious things to try,
- Put the WiFi router in a higher position
- Move the WiFi router to a more central location in your house or apartment
- Ensure the WiFi router is not obstructed by walls, furniture or other objects
Failing those thing, if you are able to, consider purchasing a better quality router. This will generally provide better coverage and faster speeds. It will also modernise your experience with features such as beamforming, MU-MIMO, and better QoS.
This post is more about getting the best out of your existing WiFi, so if you can’t upgrade your router.. these tips may help!
How WiFi works.. (You can skip if you already know this stuff) Link to heading
WiFi is a radio signal that is broadcast from your router. A router is a device that connects to the internet and broadcasts the internet connection to devices in your home.
WiFi is a shared medium. This means that multiple devices can connect to the same WiFi network and share the same frequency.
Frequency is the number of times a wave repeats itself in a second. The higher the frequency, the more data can be transmitted etc. BUT! like anything, you have to give something up to gain something.. So the higher the frequency, the shorter the range.
The lower the frequency, the longer the range, but also slower the speed. Ahh.. Right..
The main frequencies WiFi utilises are:
- 2.4Ghz - This is the most common and over crowded frequency used by WiFi routers. It has a longer range but is slower than the other frequencies
- 5Ghz - This is a higher frequency that is less crowded than 2.4Ghz. It has a shorter range but is faster than 2.4Ghz
- 6Ghz - This is the newest frequency available for use that is even less crowded than 5Ghz. It has an even shorter range but is faster than 5Ghz
The WiFi Router’s Dance Link to heading
Imagine a dance party where many devices are trying to get their digital moves out on the same dance floor. The WiFi router is the DJ, responsible for ensuring each device gets a turn to shine. Instead of a “talking stick” where devices take turns, modern WiFi routers use clever techniques to keep the party going smoothly. For the curious, here are a few of these techniques:
Carrier Sense Multiple Access with Collision Detection (CSMA/CD): Think of it like a bouncer at the door. If two devices try to enter at the same time, the bouncer detects the “collision” and makes one of them wait before letting the other in. The device that was made to wait will try again later, and the bouncer ensures a smooth entry.
802.11e Quality of Service (QoS): Imagine the DJ prioritizing certain songs or genres. QoS enables the router to prioritize certain devices or traffic flows, ensuring critical traffic gets the spotlight.
Aggregation and Bonding: Picture multiple DJs combining their music into a single, cohesive mix. Aggregation and Bonding allow routers to combine multiple physical connections into a single logical connection, increasing overall bandwidth and capacity.
By using these techniques, modern WiFi routers can efficiently manage multiple devices and minimize collisions, keeping the digital dance party going without a hitch!
Interference Alert! Link to heading

WiFi signals can be interrupted by other devices using the same frequency. Think of it like a party where everyone’s talking loudly! The most common frequency is 2.4GHz, which is shared with cordless phones, baby monitors, security camera’s and even microwaves. Yes, microwaves can ruin your streaming!
To avoid this, you can use the 5GHz frequency, but it too is becoming crowded. WiFi 6 and 7 aim to fix this issue. And then there’s the 6GHz frequency, which is relatively new and less crowded… for now.
The higher the frequency, the shorter the range. This means you need to be closer to the router to get a strong signal. Walls, floors, and furniture can also block or weaken the signal.
Range Anxiety Link to heading
Imagine your router is on the ground floor, but your devices are upstairs. You’re probably in a dead zone upstairs, this was my issue..
WiFi mesh networks can help, but they can also cause interference if they are talking to each other on the same overcrowded bands in already crowded area. A better solution is to run cables between the WiFi nodes and use them as a back haul to avoid this. Adding more routers can fix your range anxiety.
Neighbourhood Noise Link to heading
More people mean more devices, which means more interference. Your neighbours WiFi might be clashing with yours, creating noise and interference. This is especially true in apartments or town houses.
So, what can you do?
Well, most routers can handle this, but sometimes you might need to switch channels yourself. Think of it like changing TV channels to avoid static!
There are 11 channels in the 2.4GHz band and 45 in the 5GHz band. It’s not rocket science, but understanding channels can help you optimize your WiFi experience.
Tips to improve your WiFi experience Link to heading
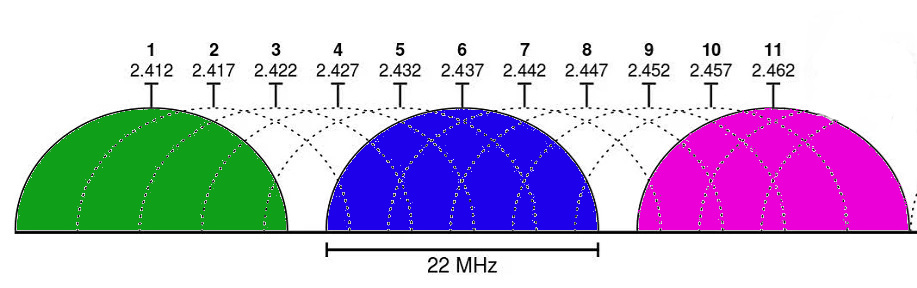
1..6..11.. What do these numbers mean?
As mentioned, your WiFi router has multiple channels that it can use to broadcast the WiFi signal. By default, most routers are set to automatically select the channel to broadcast on. This is generally a good thing, but sometimes the router can select a channel that is already in use by your neighbours WiFi router.. and overlaps occur.. yup! you guessed it.. radio interference..
“How do I change this channel setting then??”
This can be done by finding your nearest Millennial or Gen Z’er and get them to log into your router and change the channel settings (If you are not comfortable doing this yourself of course).
Finding the perfect channel ^_^ Link to heading
Let’s use real world experience to explain this with some visuals.. and to do that we are going to need an app on our phone that lets us scan our immediate area for WiFi signals and display them on a graph to help visualise just how crowded the spectrum is around us is.
If you are on Android, Netspot is a cool app for scanning your local area for WiFi signals. If you are on iOS, WiFi Sweetspots is a good app for this. For the following example I will use NetSpot as I am on Android and it is free to use.

We’ll use the WiFi Inspector to perform the scan!
Now, a word on where to be standing when you begin the scan phase.
You want to be in the area where you are having the most trouble with your WiFi signal. This is generally where you spend most of your time pulling your hair out lol
You should be able to understand the signal strength of your WiFi from where you stand, and you’ll also be able to see how crowded the channels are around you. This is helpful!
If you stand next to your router to perform this test, this can be useful, however do it from the place your having the most trouble to gain insight into what the radio spectrum is doing in that area.
Let’s check out the scan results..
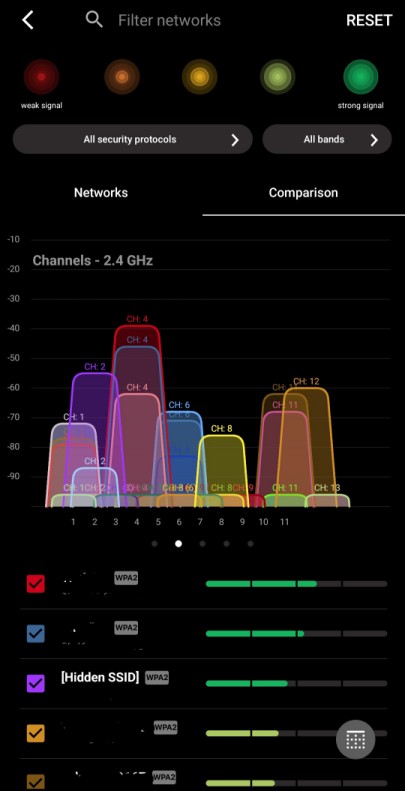
For privacy reasons, I have blurred out the names of the WiFi networks in the scan results and their MAC addresses.
As you can see, the scan results show the WiFi networks in the area on the 2.4Ghz band and the channels my neighbours are broadcasting on. Signal strength and channels are shown.
In the example above, we see a typical scenario for medium density living and WiFi networks. From the example I can see that most of my neighbours WiFi routers are preferring the lower bands (channels) for the overcrowded 2.4Ghz frequency.
Channel 1 through to 6, as you can see, it’s quite busy and there is a lot of overlap!
Notice the gap to the right of the diagram, it is not as crowded there, it is a perfect spot to shift over too!
If you are having lots of drop outs and buffering issues, you might want to consider changing your WiFi router to broadcast on channel 11 (In this example, yours will differ).
To be good WiFi neighbours we should aim to use channels 1, 6 or 11 on the 2.4Ghz band
This is because those channels do not overlap with each other. If you are using channel 1, your neighbour should use channel 6 or 11. This will reduce interference between your WiFi network and theirs.
Imagine we have a row of town houses, if unit 1 were to select channel 1, then unit 2 selects channel 6, unit 3 would select channel 11. In this scenario we’re not overlapping and causing interference with each other, thus improving the signal quality and ergo increase the speed and performance of our WiFi connections through this simple technique.

If you have more than three neighbours simply rotate the numbers and repeat, as long as two neighbours aren’t using the same channel you are good to go!
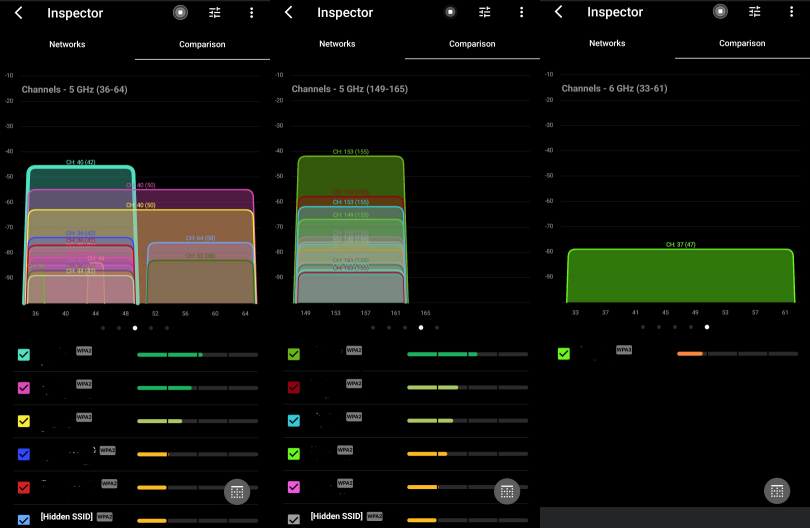
The same can be said about the 5Ghz bands, which your router may also have, ensure you pick a quiet spot for the 5Ghz frequency as well. The quiet spots (If you have them) will be the area’s of the chart with the least amount of bars.
What you see in your scan results will differ from mine, so scan away!!
Now.. this isn’t something you go banging on your neighbours door to complain about.. be kind, always! It isn’t their fault and neither is it yours!
It actually comes down to the way the different router makers have implemented their channel selection algorithms. They are all made differently and as such behave differently.
Now you are aware and are able to make the changes yourself. You may need to check back in every now and then to see how crowded things are and you may end up shifting again. This is all part of managing your own network :)
Remember to test different areas, if you are indeed having WiFi issues, like in the diagram, find the space in the diagram where its less crowded and shift your WiFi over to that channel. You’ll instantly notice a difference :)
If range or weak signal is your problem, you’ll need to place another router within your abode to improve the signal strength in that area. Try to connect them with an Ethernet cable for maximum performance.
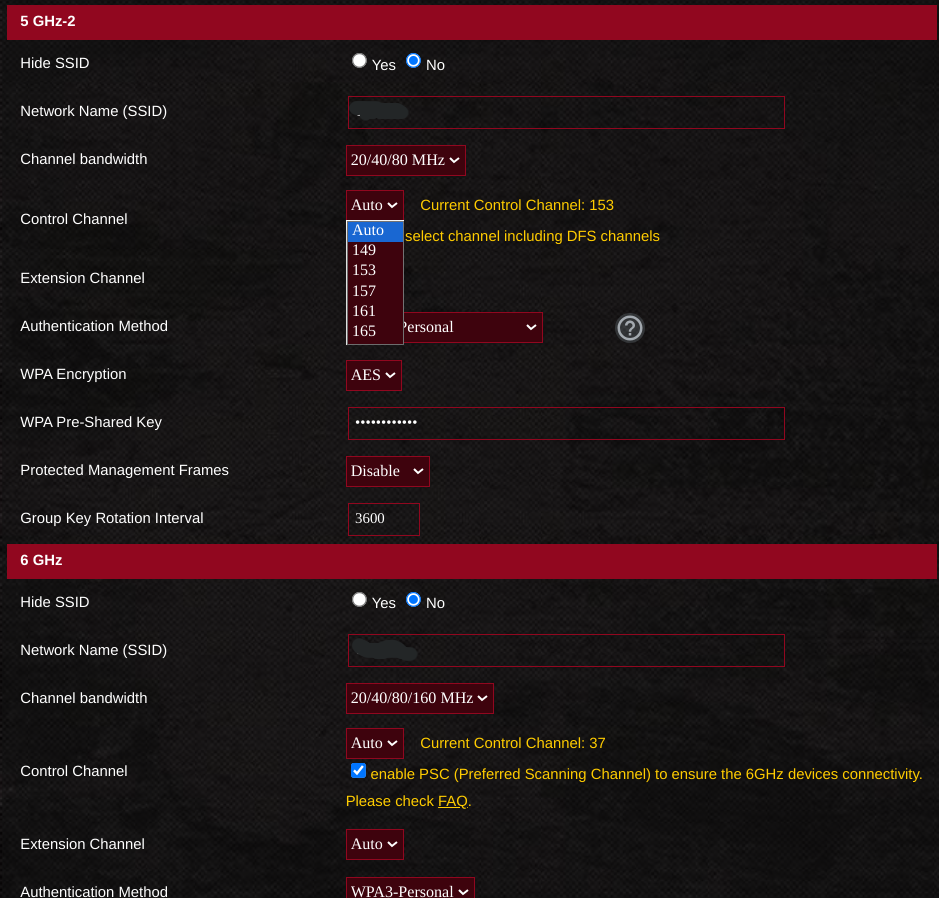
Example of the WiFi settings in your router Link to heading
Each router will be different, simply access your router and head over to the Wireless, WiFi or Wireless LAN settings.
From here, locate the frequency you want to update, for example this could be 5Ghz band like below, or 2.4Ghz depending on which band you want to set the channel for.
Remember if you are setting 2.4Ghz channels, only select 1, 6 or 11 (If you are in the ANZ region). If your router is set to Auto, it may select any of the channels. Like I said, each router behaves differently.
Well, I hope you found this helpful, and if you have any questions or need help, feel free to reach out to me on X/(Twitter) at BeardBench.
Thanks for reading! Stay safe and have a great day! ^_^